Why I Built My Own Metaframework
Doing less is a feature.
I just want to write. Medium and Substack allow that, but little else. Want a geographical map to help readers follow along? Upload an image. Stats to back up your claims? Another image. Mathematical expression? Image. For any semblance of creativity, you need to switch to a code editor, pile on tools atop a static site framework, and wave goodbye to productivity.
Compared to a writing platform, developer tools are not nearly as productive. You rarely get things right the first time, and as a result of the constant stream of paradigm shifts, you'll encounter several time sinks with no lesson at the end. I am not a fan of loading screens, and the lack of optimization in web development is a pet peeve of mine. Recently, I investigated the build performance of Next.js, and what I found was telling. Bear with me through this very technical detour.
What do metaframeworks even do?
You can think of metaframeworks as web development tools that have a frontend UI framework like React at their core, adding routing, static page generation, and server application features on top. A major benefit is that you get to use the same language for adding interactivity to your site and for templating the page itself. Next.js is a metaframework for React, and one of React's recommendations for creating a new app. That is their general introduction, but I'm more interested in what it literally spends its time doing. Let's build Next.js' starter blog template to find out.
That's 20 seconds to build just 3 pages on a 16-thread machine—not a promising start. While page generation itself takes less than a second, the majority of the time is consumed by other processes. Let's use Node.js's profiler to dive deeper.
node --cpu-prof node_modules/.bin/next build
This command generates several .cpuprofiles: one for the main thread (see below), two for webpack builds, one dominated by TypeScript, and two more threads whose purpose is not immediately apparent. We can visualize these profiles using Chrome DevTools.
There's surprisingly little happening in the main thread. It sits idle for about 13 seconds, while webpack, the bundler powering Next.js, is doing the heavy lifting in worker threads. If you look at the bottom-up view, though, you might notice @vercel/nft taking up a considerable amount of time after webpack finishes. Vercel uses this package to prune unused dependencies from code uploaded to their platform. For a static site, however, we just have to serve files — no code needs to run after the build. This means dependency pruning is simply wasted time. Since Next.js 15 removed the option to disable this feature, we can't measure its exact impact. Let's examine the worker thread profiles next.
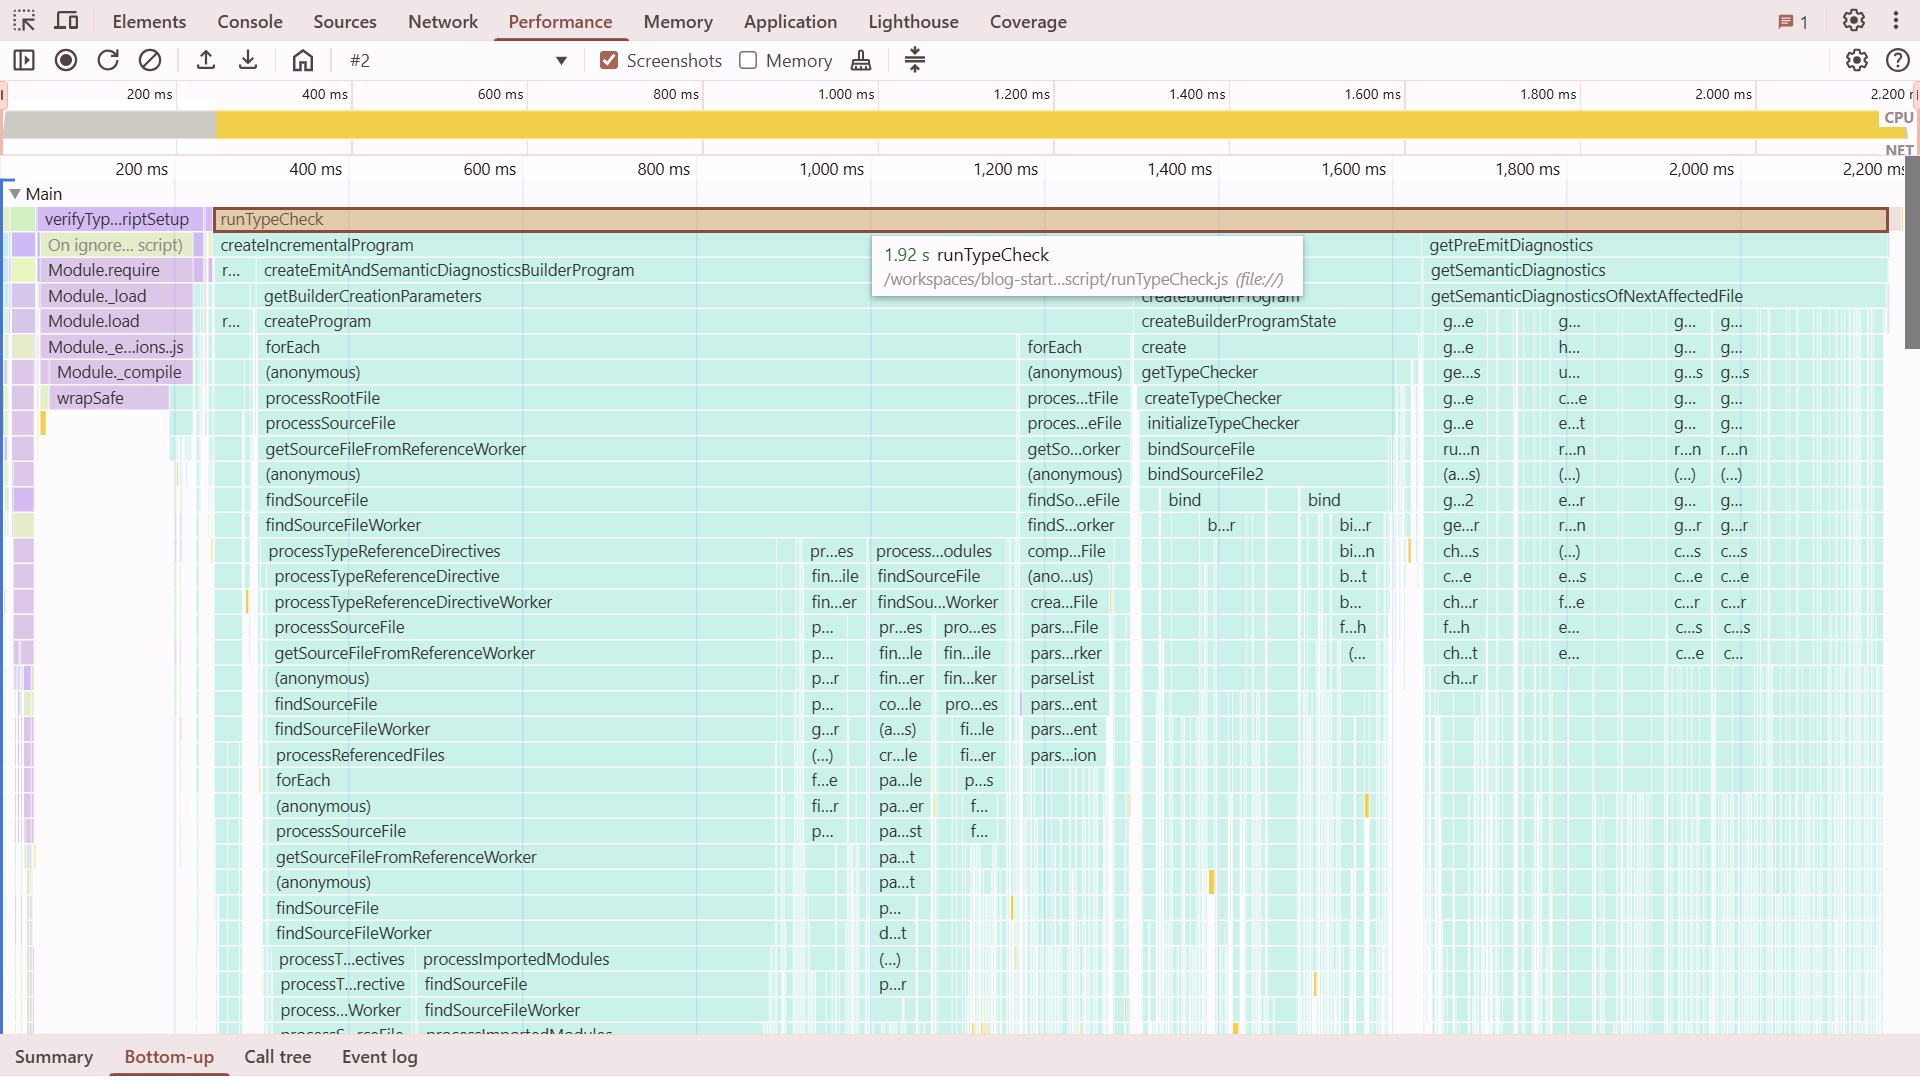
The build log showed type-checking consuming some time, and now we have its profile. Next.js runs type-checking in a dedicated worker, but interestingly, no other work happens in parallel—the actual build doesn't start until type-checking completes. The predominant function is runTypeCheck(), a TypeScript wrapper that takes about 2 seconds before the thread terminates.
Next we have the Webpack profiles, clearly consuming most of the build time. Nothing in the profile jumps out, but examining its output in the .next/server/app directory gives us some clue as to what might be happening.
The files are aggressively minified yet remain significantly larger than their sources—likely due to inlined dependencies. To assess this process's impact on build time, I experimented with configuration options. (Interestingly, disabling minification is labeled as experimental.) After sifting through documentation and some trial and error, I arrived at this configuration:
/** @type {import("next").NextConfig} */
const nextConfig = {
    typescript: {
        ignoreBuildErrors: true,
    },
    eslint: {
        ignoreDuringBuilds: true,
    },
    experimental: {
        serverMinification: false
    },
    serverExternalPackages: ["classnames", "gray-matter", "react-dom", "remark", "remark-html"],
}
module.exports = nextConfig
Dissappointingly, the changes barely made a difference— but I suppose that's not surprising. From previous experience, I know that the primary factor in bundling time is usually the module graph's size. But we only have a handful of modules in the starter blog.
Build performance might improve in the future with Turbopack, a successor to Webpack written in Rust. More important than performance, though, is the observation that Next.js is constantly doing too much. Everything felt more complicated than it needed to be. Just because it can build everything doesn't mean it can do it well. I am not the first to realize this, either. ComfyDeploy moved from Next.js to an SPA with Rspack, DatoCMS migrated to Astro, and Northflank implemented an in-house SSR solution.
This is not what I asked for.
I can code. I want to make my writing stand out using it. It sounds simple, but it gets very... distracting. Next.js is the most notable example, but it's not by any means unique. I'm often solving problems created by the web of tools rather than them helping me solve mine.
So what would be an actual solution to my problems? To help answer that, I made a checklist:
- A visual editor focused on content.
- Extendable with custom components built with React, Vue, or Svelte.
- Instant publishing: updates to a single page shouldn't trigger a complete site rebuild.
- Compartmentalization: Writers write content, developers write code. I don't want a command line or CI/CD in the middle of the writing-publishing workflow.
Additionally, I would like to have ownership. I don't want to write something that can only be shared on a single platform, or be locked into a hosting service.
Good off-the-shelf solutions should do the heavy lifting while being unopinionated about the aspects unique to your project. It's a difficult balance to strike, and involves a lot of subjectivity. A single solution can't appeal to every potential project. My checklist seemed especially unique.
I found some interesting projects. ObservableHQ offers fantastic interactive visualizations and a visual content editor, but is not extensible with framework components. Builder.io has great framework component support, but they don't have a content editor. WebStudio is similarly oriented towards marketing, making it cumbersome for straightforward writing. It looks more and more like I have an interesting project to build on my own.
Now, this is a project where Next.js is the tool for the job. In fact, PayloadCMS on top of Next.js would provide a great starting point. However, the constant cycle of deprecation and migration does not inspire confidence. It's going to be a side project, and I only have so much energy to spare on the upkeep. I wanted a simple and strong foundation, so I decided to skip the kool-aid.
Why reinvent the wheel?
I am not building a flavor-of-the-week UI library. React has valid criticisms, but it gets things done. On the other hand, SSR/SSG frameworks built around the popular UI libraries offer more opinions than solutions. You'd expect, as Rails and Laravel developers certainly do, that after years of active development, there would be a good out-of-the-box story for authentication, content, or storage. But the JavaScript ecosystem progresses in circles rather than forward, becoming slower and buggier each lap.
You'd be surprised at the size of the wheel being reinvented. Besides, this just seems like a fun project.
Building a meta-framework
Let's work backwards and think about what we need our framework to do. What follows is a recipe for creating a framework capable of building the same blog starter we profiled with Next.js. If you want to skip ahead and see the final result, you can find it at github.com/lilnasy/cayman. Keep in mind that it's not a replacement for your favorite full-stack framework. Instead, consider it a demystification of its magic.
Metaframeworks are built on top of bundlers. Vite is a popular alternative to webpack, the bundler powering Next.js. I have a lot of experience working with Vite and writing plugins for it, but it is complex and unpredictable. I regularly run into known issues and some settings break the projects in seemingly unrelated places. I wanted something more reliable so I went with esbuild. Esbuild is relatively non-configurable, but it is fast. I might migrate to something else down the line, but for now, I can enjoy some absurdly quick iteration cycles.
File-Based Routing
We start with file-based routing. I decided to forgo implicit layouts. For example, pages/posts/[slug]/page.tsx + pages/posts/[slug]/layout.tsx + pages/posts/layout.tsx + pages/layout.tsx is replaced with a single pages/posts/[slug]/page.tsx where the specific layout is explicitly imported and used by the page. This removes some of the guesswork from page composition, and also makes it accessible to editor tooling features like go-to-definition.
import Layout from "./layout.tsx"

export default function Post() {
    return <Layout>
        <main>
        ...
        </main>
    </Layout>
}
Now, we can tell esbuild where to look for these pages as entryPoints:
import { build } from "esbuild"

await build({
    bundle: true,
    entryPoints: ["./pages/**/*.tsx"],
    outdir: ".cayman/builder",
})
Let's try to run a build:
X [ERROR] Could not resolve "node:fs"
lib/api.ts:1:15:
1 | import fs from "node:fs"
Since esbuild builds for the browser by default, it doesn't treat Node.js built-in modules like node:fs any special. It tries to find them the same way it would an installed NPM package and fails. We can fix this by configuring the platform field to "node". Esbuild will now allow the built-in modules to stay as is, and instead of the browser-compatible versions of the dependencies, it will include the node-compatible versions, if available, when creating the bundle. However, since we plan on creating static pages immediately after building, inlining dependencies is unnecessary and we can skip it by setting packages to "external".
import { build } from "esbuild"

await build({
    bundle: true,
    entryPoints: ["./pages/**/*.tsx"],
    outdir: ".cayman/builder",
    platform: "node",
    packages: "external"
})
Rendering HTML
We bundled the tsx pages, but they don't do anything yet. We still need to build a site from them. To continue, we ask esbuild to give us information about its output with the metafile option.
import { build } from "esbuild"

const { metafile } = await build({
    bundle: true,
    entryPoints: ["./pages/**/*.tsx"],
    outdir: ".cayman/builder",
    platform: "node",
    packages: "external",
    metafile: true
})
The metafile tells us how the built files relate to the source files. It has the following structure:
{
    "inputs": {
        "components/container.tsx": {"bytes": 176, "imports": [...], "format": "esm" },
        "lib/constants.ts": {"bytes": 320, "imports": [], "format": "esm" },
        "theme.css": {"bytes": 34822, "imports": [] },
        "pages/posts/[slug].tsx": {"bytes": 1391, "imports": [...], "format": "esm" }
    },
    "outputs": {
        ".cayman/builder/PGVO2XNI.js": {
            "entryPoint": "pages/homepage.tsx",
            "cssBundle": ".cayman/builder/VHBJO7YQ.css",
            "inputs": [Object],
        },
        ".cayman/builder/VVQ3ZBEE.js": {
            "entryPoint": "pages/posts/[slug].tsx",
            "cssBundle": ".cayman/builder/CVLFGDWO.css",
            "inputs": [Object],
        },
        ".cayman/builder/EGXSYJYU.js": {
            "inputs": [Object],
        },
    }
}
Not all details of the metafile are relevant. For now, all we need to know is that if an output file corresponds to one of our pages, it will have the entryPoint field and it will be set to the path of the source tsx file. We can filter the outputs to find the pages, and provide them to react-dom's prerender function.
import { createElement } from "react"
import { prerender } from "react-dom/static"

const { metafile } = await build({ ... })
for (const outputPath in metafile.outputs) {
    const outputMetadata = metafile.outputs[outputPath]
    if (outputMetadata.entryPoint) {
        const pageModule = await import(process.cwd() + outputPath)
        const { prelude } = await prerender(createElement(pageModule.default, {}))
        // ...
    }
}
This takes care of the homepage, but the module responsible for blog posts generates multiple pages using generateStaticParams().
import { createElement } from "react"
import { prerender } from "react-dom/static"

// ...
if (outputMetadata.entryPoint) {
    const pageModule = await import(process.cwd() + outputPath)
    if (pageModule.generateStaticParams) {
        const staticParams = await pageModule.generateStaticParams()
        for (const params of staticParams) {
            const { prelude } = await prerender(createElement(pageModule.default, { params }))
            // ...
        }
    }
}
We have seen this thing called "prelude" twice now. Instead of providing a string with the HTML contents after all the async components have run, it provides chunks of HTML as soon as they become available as a ReadableStream.
Let's render the stream into a file. Node.js file system APIs also have streams, but they are not the same as the one provided by React. To distinguish the two, the terms Web standard or WHATWG Streams are used for the prelude kind. Node.js implemented the concept of streams before the web standard existed, and web browsers settled on different naming and behavior. Fortunately, Node.js now provides converters in the node:stream module. We will use createWriteStream to write to a file, Writable.toWeb() to make it connectable to the React stream. Then, .pipeTo() will connect the two and automatically close the opened file when React is done streaming.
import { createWriteStream } from "node:fs"
import { Writable } from "node:stream"

const nodeWriteStream = createWriteStream(
    `.cayman/site/posts/${params.slug}/index.html`
)
const standardWritableStream = Writable.toWeb(nodeWriteStream)
await prelude.pipeTo(standardWritableStream)
We wrote React components and markdown code, and now we have a bunch of HTML files! If it works, we have replaced a few hundred dependencies, and several tabs of documentation and bug report threads. But of course, it doesn't work. womp womp.

There are no stylesheets in the head tag.
Qu'est-ce Que C'est
So where are the stylesheets? Esbuild compiled them, and told us where in the metafile, but since it has no control over the rendering process, we need to pass the information along to React. React DOM has a convenient API to add scripts during prerendering in bootstrapModules. It doesn't have an equivalent for stylesheets. We need to be a little creative.
We could easily pass the stylesheet path to the page's exported function, letting the page add it to the head element, but that makes the project rigid. If the head is rendered by a layout, it has to be explicitly passed forward. This may sound familiar as this is pretty much the pattern well-known as "prop drilling", and the well-known alternative is contexts. However, prerendering allows any component to load data from a database or a CMS asynchronously. Async breaks React's context API. Fortunately, Node.js has a built-in API that comes to the rescue!
Think of AsyncLocalStorage like React context, but for async functions. Similar to how React context allows a parent component to send data to a child component without passing it directly, Node.js's AsyncLocalStorage allows an async function to send data to a downstream function without passing it directly.
import { AsyncLocalStorage } from "node:async_context"

export const headStorage = new AsyncLocalStorage<{ rel: string, href: string }>()
const outputMetadata = metafile.outputs[outputPath]
const head = [{ rel: "stylesheet", href: outputMetadata.cssBundle }]
const jsxNode = createElement(pageModule.default, { params })
const { prelude } = await headStorage.run(head, prerender, jsxNode)
Here's how it works: headStorage, an AsyncLocalStorage instance, stores the head elements while calling React DOM's prerender(). Now the prerender() function and all functions it calls, directly or indirectly, can retrieve the head elements by calling headStorage.getStore(). The head elements remain consistent with the page even if another page with a different set of head elements is being rendered concurrently.
Calling headStorage.getStore() directly is still cumbersome. To improve the experience, we can wrap it into a component that the project can add to the layout.
export default function HeadElements() {
    const headElements = headStorage.getStore()
    return headElements.map(({ rel, href }) => <link rel={rel} href={href} />)
}
.getStore() may seem familiar if you've used Next.js' new headers() or cookies() functions. They are able to magically find the current request because they are also based on AsyncLocalStorage!
Now, we finally have a static page that looks nice, but what's this?
The theme switcher button does nothing. That's because, so far, we have been using React only as a templating language. It renders HTML and nothing else. How could we generate code that runs in the browser and code that runs on the server from the same source code? Fortunately, I am not the first to tackle this problem. As we have seen with Next.js, most full-stack frameworks run two builds (at least) under the hood. So let's write an esbuild plugin that runs a second build for the browser when the main build finishes.
const esbuildPlugin = {
    name: "browser"
    setup(build) {
        build.onEnd(async () => {
            build.esbuild.build({
                entryPoints: ["./pages/**/*.tsx"],
                platform: "browser",
            })
        })
    }
}
Now, do we need to build all pages for the browser? Really, the only necessary part is the theme switcher. Everything else is non-interactive, so much of the code run by browsers would be deadweight.
Client components
RSC (React server components) creates a distinction between components that should be rendered only on the server and those that can become interactive in the browser with the "use client" directive. RSC is not the only player in town, though. Astro provides a precise level of control over hydration with the client:* attributes.
So which one should we use? Astro's approach requires scanning the code for all components using the attributes. That is difficult to implement. In fact, even in Astro, it is very brittle. For example, the following innocent-looking code fails to render because the name of the rendered component doesn't match the name in the import statement.
---
import CounterComponent from "../components/Counter.tsx"

const Counter = CounterComponent
---
<Counter count={0} client:load>
    <h1>Hello, React!</h1>
</Counter>
The attribute approach lets you mark components as interactive where it is used instead of where it is defined, but a component either is interactive or it isn't. You wouldn't want to use a component as interactive on one page and as non-interactive on another. While hydration directives are a nice knob to turn, they are an optimisation you don't want to think about all the time. A definition-site approach ("use client") is more intuitive, but it isn't simple to implement either.
I don't want to over-engineer in the foundational parts. So I went with an approach that has not received much attention yet: import attributes. Let's use the platform™!
import ThemeSwitcher from "./theme-switcher.tsx" with { interactive: "true" }

export default function Page() {
    return <Layout>
        ...
        <ThemeSwitcher />
        ...
    </Layout>
}
Import attributes is a recent addition to the JavaScript language. It allows you to specify information about how a module should be imported. Currently, the only standard attribute is type, which can have only one value: "json". It tells browsers to load the referenced file and parse it as JSON instead of as JavaScript code.
With a bundler at our disposal, we can implement our own attributes. In this case, we want the interactive attribute to mean that the imported component should be hydrated. Esbuild performs the heavy lifting of analyzing the code to find the import attributes, we can write a simple plugin that collects the client components for the second build.
const esbuildPlugin = {
    name: "browser",
    setup(pluginBuild) {
        /**
         * List of modules loaded using the "interactive" import attribute.
         */
        const clientComponents: string[] = []

        pluginBuild.onLoad({ filter: /.tsx$/ }, load => {
            if (load.with.interactive === "true") {
                clientComponents.push(load.path)
            }
        })

        pluginBuild.onEnd(async () => {
            await pluginBuild.esbuild.build({
                entryPoints: [...clientComponents],
                platform: "browser",
            })
        })
    }
}
Hydration
To make all the interactive components... well, interactive, we need a way to find their corresponding DOM elements and run react-dom's hydrateRoot for each one. This is where custom elements' connectedCallback comes in.
customElements.define("interactive-component", class extends HTMLElement {
    async connectedCallback() {
        hydrateRoot(this, /* ... */)
    }
})
During static rendering, we wrap all components needing hydration with the interactive-component custom element using our plugin. We need the URLs of the built output of the component, which would only be available after the build is complete. So instead of hardcoding the URL directly, we write code that imports it from a special file, browser-assets.js, that will be created as a last step of the build.
const esbuildPlugin = {
    name: "browser",
    setup(build) {
        const browserBuildEntrypoints: string[] = []

        build.onLoad({ filter: /.tsx$/ }, load => {
            if (load.with.interactive === "true") {
                browserBuildEntrypoints.push(load.path)
                return {
                    contents: `
                        import buildMetadata from "./browser-assets.js"
                        import { default as Component } from "${load.path}"

                        export default function (props) {
                            const { url } = buildMetadata.outputs["${load.path}"]
                            return <interactive-component url={url} props={JSON.stringify(props)}>
                                <Component {...props} />
                            </interactive-component>
                        }`
                }
            }
        })
    }
}
We rendered the props and the URL as attributes on our custom element. It's time to use them.
customElements.define("interactive-component", class extends HTMLElement {
    async connectedCallback() {
        const url = this.getAttribute("url")
        const props = JSON.parse(this.getAttribute("props"))
        const componentModule = await import(url)
        hydrateRoot(this, createElement(componentModule.default, props))
    }
})
Let's look at the result.
And just like that, we have interactivity. It's automatic, granular, and implemented in about 50 lines of code!
Freedom from waterfalls
If you look at the network tab, you might notice that the JavaScript files are loaded one after another. The browser first loads the custom element. The custom element loads the theme switcher. The theme switcher loads React. You won't notice this with the server running directly on your laptop, but in the real world, there could be a noticeable delay to each load due to network conditions and visitor's location.
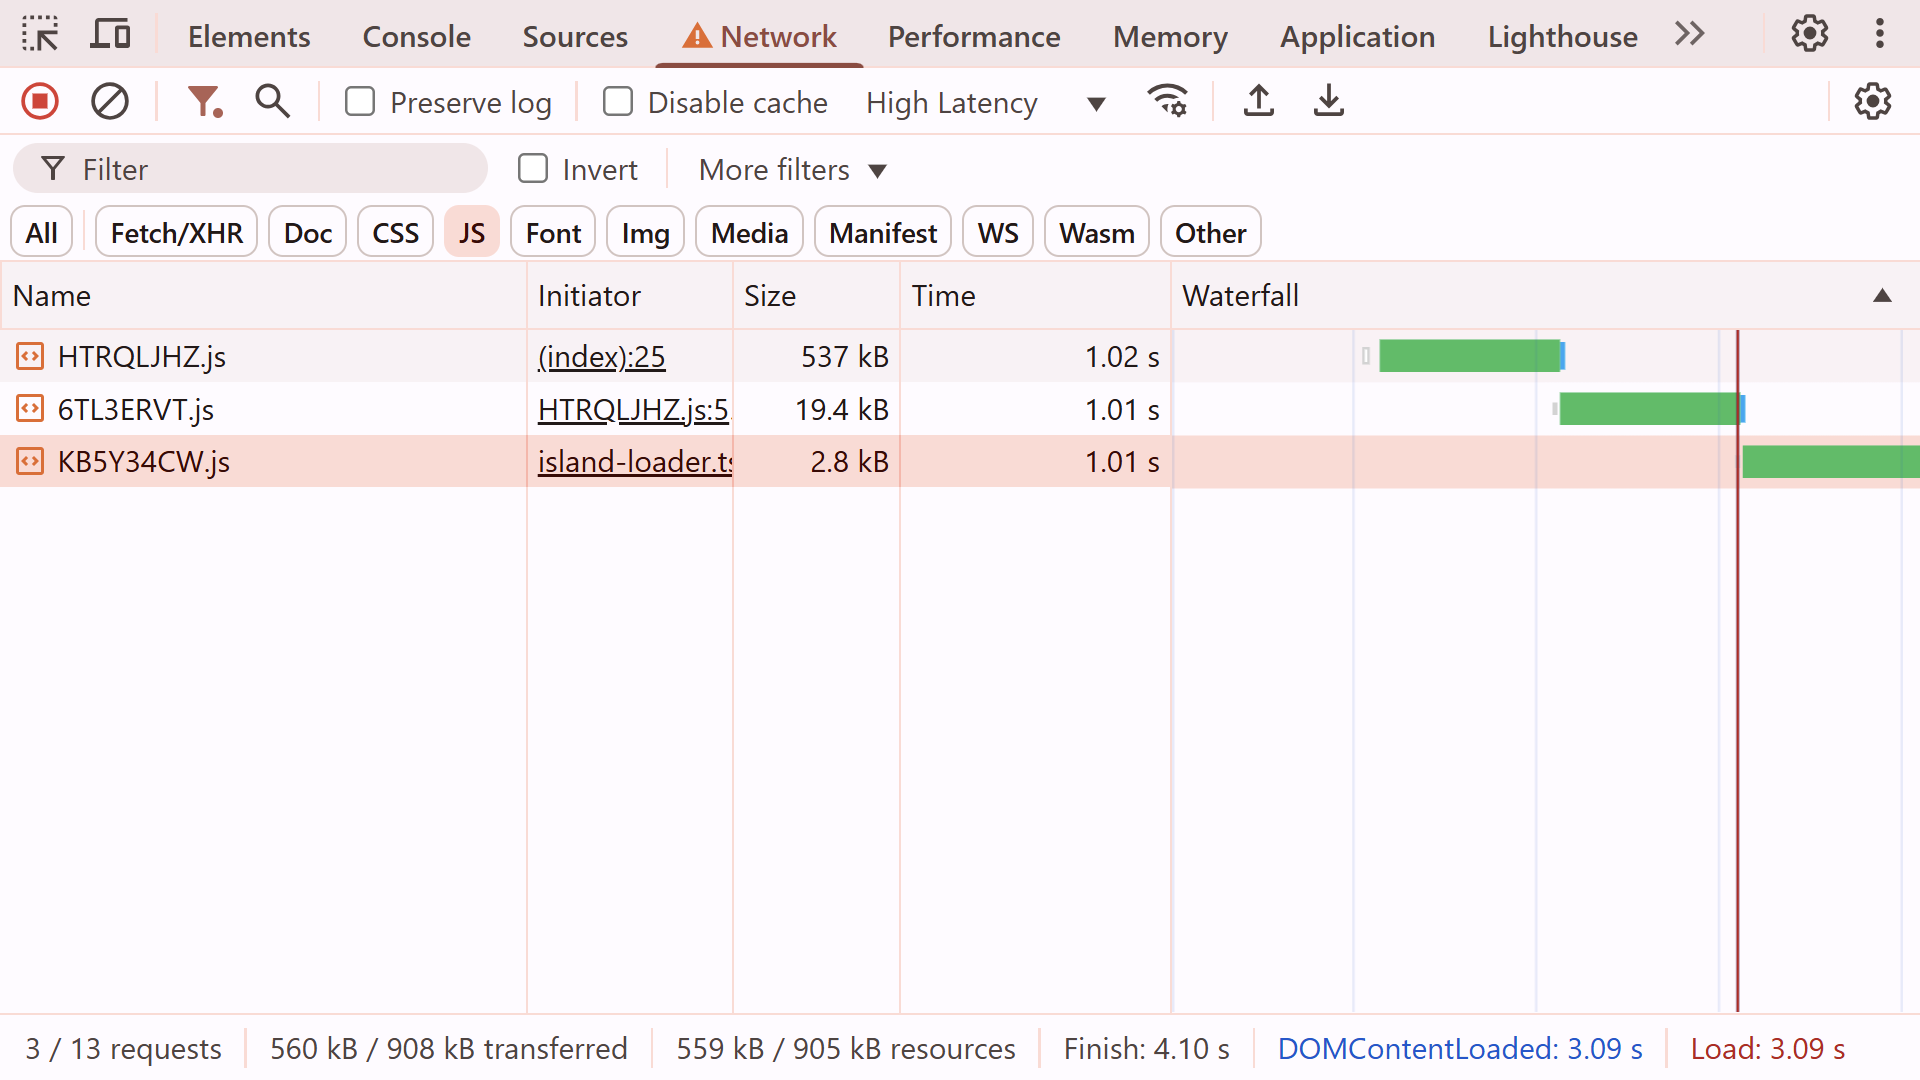
We have a goodie box of information from our friendly bundler. All connections between modules are laid out in the metafile. We can use that information to reduce these roundtrips by creating rel=modulepreload links. This lets the browser immediately gather all the ingredients for interactivity, and by the time our code runs, it will be ready to cook!
Let's start by gathering dependencies of each interactive component.
const { metafile } = await build.esbuild.build({
    platform: "browser",
    metafile: true,
})

const importedByInteractiveComponent = metafile.outputs[interactiveComponentPath].imports

// direct dependencies
for (const imported of importedByInteractiveComponent) {
    const importedMetadata = metafile.outputs[imported.path]
    dependencies.push(importedMetadata.path)

    // transitive dependencies
    for (const imported of importedMetadata.imports) {
        const importedMetadata = metafile.outputs[imported.path]
        dependencies.push(importedMetadata.path)
    }
}
Only so many resources can be preloaded at once, and not every interactive component is equally important. Which is why preloading should be opt-in. Let's render rel=modulepreload links only when the component is rendered with the preload prop.
<ThemeSwitcher preload />
if (load.with.interactive === "true") {
    return {
        contents: `
            import { default as InteractiveComponent } from "${load.path}"
            import buildMetadata from "./browser-assets.js"

            export default function ({ preload, ...props }) {
                const { url, dependencies } = buildMetadata.outputs["${load.path}"]
                return <interactive-component url={url} props={JSON.stringify(props)}>
                    <InteractiveComponent {...props} />
                    {preload && dependencies.map(dep => <link rel="modulepreload" href={dep} />)}
                </interactive-component>
            }`
    }
}
Let's see how this performs.
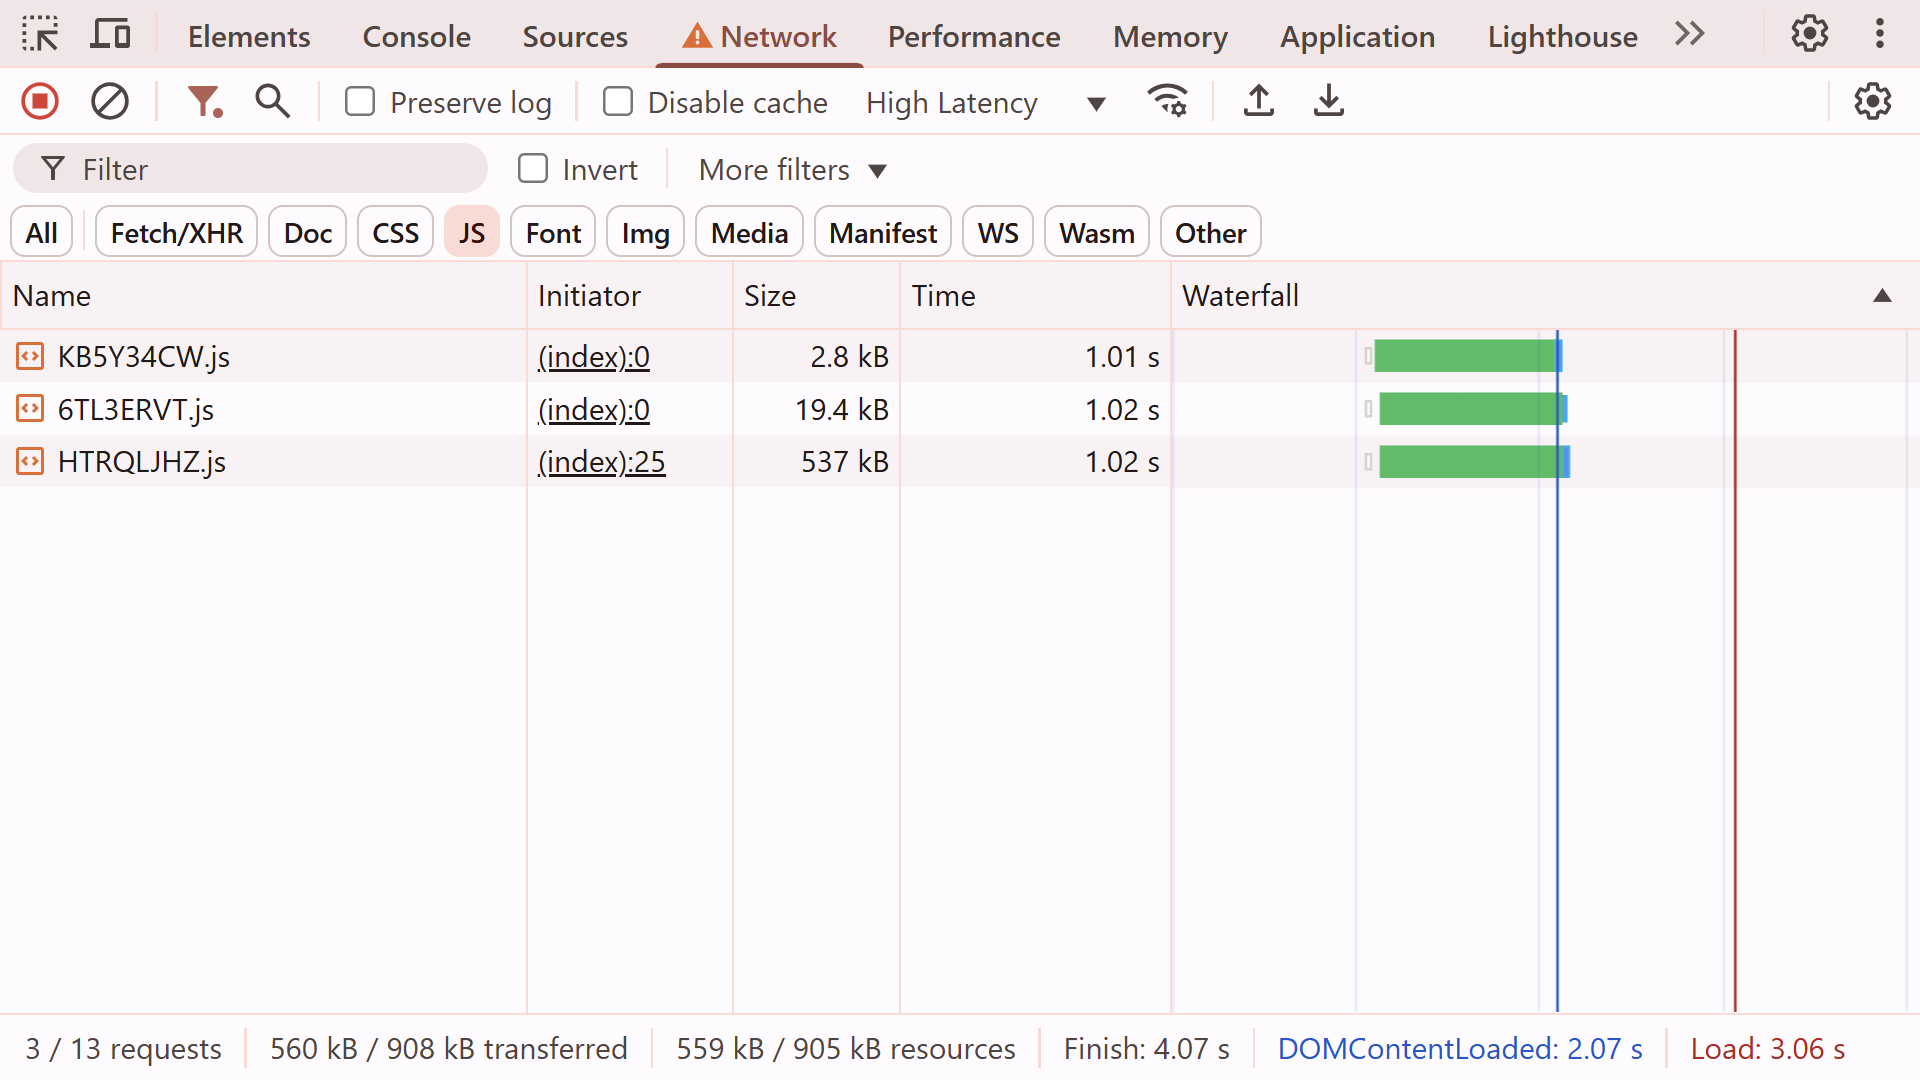
All the resources are loaded in parallel, and the theme switcher is ready to go after just one roundtrip!
What's Next?
You can check out the production build of the blog at blogstarter.pages.dev. The source code of the framework, along with the example blog, is available on my GitHub at github.com/lilnasy/cayman. With the framework itch out of my system, I want to visit some exciting ideas for the content editor.
Why stop at React?
React is the most used among the component-based frameworks (if you're not married to the idea of components, jQuery dwarves React in terms of adoption), but the frontend landscape is more diverse than ever.
While HTTP Archive data shows React's dominance in current usage, I suspect it's not as popular a choice for new projects. In the latest State of JS survey, "React issues" was the most common response by developers to a question about pain points. That is undoubtedly in part due to React simply being widely used. Nevertheless, a lot of developers would pick something different from what they (have to) use daily, and building small, isolated components is the perfect opportunity!
We have already seen how to integrate interactive components. There was nothing special about React. The interactive-component custom element could just as well use React for one component, and Svelte for another. In fact, Eleventy and Astro do exactly that!
The content editor UI
While you have several options for a visual editor for vanilla markdown, you're on your own when you introduce custom blocks. On the other hand, I have built using TipTap, which uses JSON as the serialization format, and it left a good impression on me. TipTap is built on top of Prosemirror, a lower-level content editor framework. It is highly customizable, and unopinionated about your framework of choice. Additionally, it only brings a small list of dependencies, which is important for scaling a potentially very complex project.
AI?
I am hesitant to consider LLMs a feature. They have been shoehorned into a lot of the products I use, and have been a nuisance in most. However, writers don't need much invention. The assistance could be in the occasional personalization, and in hooking up the data with prefab visualizations. It would be almost invisible — many good inventions are. Working with such a small, well-known scope is exactly what the current state of LLMs is reliably good at. In fact, even small language models might be viable.
You wouldn't put components in a database
The long list of CMS options becomes awfully short when you need to introduce your own custom components. Being "headless" is touted as a marketing point, but it usually means a tight border between UI generated by the CMS and the rest (the "head"). That doesn't have to be the case if your content management is ✨headful✨.
Val.town has done an incredible job creating a collaborative platform for backend code. No reason frontend code can't join in on the fun! I want to allow components to be shared publicly, liked, discussed, forked, collaboratively improved, and then used directly from the content editor.
Fin
The content space is odd: full of options, yet full of dissatisfaction. I'm really excited to build something that lets developers and writers work better together. Imagine being able to add custom interactive graphics as easily as you add GIFs on messaging apps! I could just write.
If you're working on something similar or you are just enthusiastic about the idea, I'd love to chat. You can reach out to me at hi@arsh.sh.